Showing posts with label tutorial. Show all posts

Thursday 24 November 2016

How to get started using what's app Video call and install

WhatsApp video call feature, was recently released for a better improvement of WhatsApp messaging App,with rolled out to Android, iPhone, and Windows phone users, starting with users in India, estimated at 150 million.

Valuewalk reports that the video feature on Whatsapp was introduced because sometimes voice and text just aren’t enough, which allows person-to-person video calls.

The latest feature requires you to simply update yourApp to make your first video call. If your iOS or Android smartphone is not configured to receive automatic updates, simply go to the App Store or Google Play and check for available updates.

After performing the update and you don’t see the video calling option, or showing you an error, you canthen download the WhatsApp beta version APK to see if things work any better.Steps to get

WhatsApp video calling feature:  Open Google Play

and search for WhatsApp – Open WhatsApp’s Google Play listing – Scroll down towards the bottom of the page – In the section that says Become a beta tester tap on I’M IN – Confirm on the next screen and wait for a few minutes – Come back to WhatsApp listing page on Google Play – You should see an option to Update WhatsApp to beta version.

For iPhone users you may have to wait for WhatsApp video calling to be made available to them.

On how to make a WhatsApp video call: Open WhatsApp – Go to the Contacts tab – Find and tap the contact you want to initiate a WhatsApp video call with – Tap on the phone icon towards the top of the screen – From the popup choose Video call – That’s it – you’ve just made your first WhatsApp video call!y
Read More »

Saturday 29 October 2016

How To increase and Boost your Android Ram with SD card

Today i am introducing a way to increase ram in Android Mobile phone using SD Card. Android which is the best mobile OS till now and already got a big mark with its feature andincreasing number of smart phones based on Android. About 75% smart phone in the world are based on Android. And also there is increase of heavyapplication that require more Ram. So, either change the phone or use this method to increase RAM of Android phone.
There is large Android phone range from 4000 Rs to 40000 Rs. The difference in range is due to their hardware otherwise you can find a same Android version on a 4000 Rs mobile that a 40000 Rs Smart phone is using. This is because Google Android is Open source and is free.

Must Check: Top Android Phone under 10000  in INDIA

The major problem with these Android phone is they stuck and main reason behind is low internal memory or RAM. If you run too many application at the same time your phone will freeze due to less ram. So here i will tell you How to increase ram in Android phone

This difference in hardware can greatly affect yourphone, you can not use bigger size apps, and can not play heavy games or you can not run multiple application at the same time or the hanging problem and many more. But everyone can not afford the high range phones. And majority of this problem is due to the processor and the ram size.

Is there any solution to these problems?

Yes, one can increase ram in android phone. This may certainly help you to play some heavy game and may run many application at same time. But its not the perfect solution as things depends on your processor and other hardware also. But increasing ram can help you a lot and is very easy and cheap to increase ram in Android Smart Phone.

How To Increase Ram In Android Mobile Phone using SD Card ?

Increasing ram does not mean that you are internally adding some hardware to your Android device. Its not possible for a normal man to alter the hardware of Android phone so as to increase its Ram.Its been risky and one need to be professional to change the hardware. And also manufacturer has some guidelines for this.

But don’t worry there is some simple way to increase ram in Android, you just need to follow theinstruction. And you can easily increase your ram in maximum 10-15 minutes. Using this method or trick you can increase your ram upto 4 GB.

How To Increase Ram In Android Mobile Phone /Tablet

There are two methods by which you can boost or Increase RAM in Android Phone. First method needs some application, there are both Premium and Free Applications on Android Market or Play Store. You can download them and can easily increase ram of your Android Device.

Second Method is Manual Method, you need to docertain Task Manually to increase Ram in Android Phone.

Method 1:How to increase ram in Android Mobile using App

ROEHSOFT RAM Expander (SWAP) (Premium App)

Ram Expander is an awesome app that will increase Ram of your Android Device by converting a Part of SD Card Memory into RAM. That is your SD Card will now be used as a Virtual Ram for your Android Device.

Features

Free SD card memory as a RAM use (SWAP RAM / SWAP MEMORY)
– Swapfile RAM expansion up to 4.0 GB (file system limit)
– No limit on SWAP partition!
– The usual performance degradation when paged not occur with sd card from class-8
– Widget for PNP swap (swap on / off swap)
– Detailed Memory Information & Analysis
– Autorun
– Swappiness kernel parameter set
– Easy foolproof use (1 click optimization and automatic calculation)
– Supporting Tung all Android devices (root access and Kernelswap support)

How to Use RAM Expander to Increase RAM in Android Smart Phone

Before buying this app you must check the compatibility of this app with your device. Try this testing app MemoryInfo & Swapfile Check before you buy RAM Ex-pander. Whether Your device is compatible with ROEHSOFT RAM Expander.

  • If your device is Compatible, then Buy and Download this RAM Expander.
  • After installing it chose your language.
  • Now Create a SWAP File by clicking Swap Active and Enable it.
  • After you finish with this just click on the Grey Boxand Activate SWAP

And you are successfully increased Ram of your Android device.

Free Method

Manual Method to increase ram in Android Smart Phone

You just need to follow these steps to increase RAM of your android device.

Requirements to increase ram in Android Smart Phone

  • SD Card of Class 4 or Higher.
  • Rooted Android Smart Phone or tablet. (To Root Any Android Phone check How to Root)
  • Windows Pc
  • SD Card Reader
  • And some Software

Note: To increase your Ram, Your phone must be rooted. To root any android phone check Rooting Guide.

Step 1: Check whether your Android phone support swapping or not :

Note: To convert your SD Card into Ram, you phone need to support Swap function. To check this download Swap Check application. Try this testing app MemoryInfo & Swapfile Check.

If your device support Swap function then proceedwith Step 2

Step 2: Now you need to partition your SD Card.

  • For this Google Mini Tool partition and Download it on your Windows PC.
  • Now Connect your SD Card to your PC. You can use Card Reader for this.
  • Now open Mini Tool Application and click on your SD card and Select the Delete Option.
  • This action will Format your Card and now you have an unallocated Space.
  • Now Make partition by right clicking on your SD card. Select the partition as primary and file system as FAT 32 for card more than 4GB.
  • Leave about 1 GB memory for next partition.
  • Then select done and again click on make partitionoption select primary partition but change the file system to EXT2, EXT3 or EXT4.
  • Click on apply changes and after processing for few minutes your partition is completed.


Step 3: Root Your Android Device

  • Now you need to Download and install Link2SD.
  • Launch this app and give root permission. Now Chose the .ext partition that we made earlier.
  • Sorts the app and start linking them.

Step 4: Increasing RAM of your Android Device

  • For this you need to Download Swapper for Root.
  • Launch the app and select the amount of RAM youwant to increase.
  • This will create a .swp file and it will increase the RAM of your Android Device.

Now Check for your Ram Size. It must have increased by the amount you selected.

Other Free Apps to Boost RAM

If you don’t want to waste money on buying this premium app. There are hundreds of free apps that also claim to increase or boost the Ram of Android Device by optimizing RAM of your Android Device. Here i am listing few tested and verified apps to increase ram in android.

Smart RAM Booster : Free app to increase Ram in Android

Its the most popular app to optimize RAM of your Android device. It Works by Killing the Low priority Processes or by Allocating Memory for High Priority Tasks. It is very light weight and very small app with a great user interface and is come with four different modes: Aggressive, strong, medium and gentle.

Download Smart RAM Booster

Memory Booster : Free app to increase Ram in Android

It is another popular app to optimize the Ram of your Android Device and is available in both free and premium version. Easy to use app with great user interface. It optimize the memory of your Android device by De-fragmenting Your Memory or by Preventing Memory leaks caused by different Applications

Download Memory Booster

That’s it, you have successfully increase ram in Android Smart phone. But if you still have any problem regarding this. You can ask it in comments.


Read More »

How To unlock forget password memory recovery

Manytime we are forget our mobile phone’s micro SD car card’s or memory card’s lock code number, Using this you can Unlock card of Xolo, Carbon, Spice, Sony, Blackberry, Iphon, Ipad, Nokia, Samsung.

If we send to professional worker of mobiles phones they take some money for this, Maybe they will do it by formatting, But day we are sharing with you some tips and tricks also useful codes using that you can recoveryour memory card password very easy without any money.Actually one day i was also forget it then i think if i have any trick for this you that i can do it but on that time i was not.

Then i test some method for all mobile and get some useful and fast method for this, which is alsosharing with you.

What is Memory card password remover

recover Method If are you thinking that using one method you can done all mobile phones micro SD card, but i wanna clear with you that all type mobile like os, android and other all have different method for this, Its depend on mobile type or device series, But don’t worry we are trying to share with you all complete method for this for all type mobile phone. I am sharing with you many methodusing thatyou can done any card.

Note:–You can use Below   Method for all Type Mobile Phones

How to Unlock Memory Card Forget Password Recover

*.Method 1

–  by using Bluetooth

*.First you must go on file manager of your Phone.

*.Now simply Settings choose system folders,

*.Now Find  mmcstore in system folder.

*.Just send that mmcstore file to pc using IR/Bluetooth

*.Now open that file using Notepad in your Computer.

*.Just search your password you will see within there.

How to Open Locked Memory Card in Nokia Mobile Phone

Method 2

– By using Symbian Mobiles

*.First you must installX-Plore using mfireApplication.

*.After Install X-Plore open it and press Zero

*.You must  select “Show the System Files”

*.After this go on     C:/Sys/Data/Mmcstore

*.After get Above Path just open HEX Viewerby Press 3

*.There you will see many Column just see third column.

*.You will see like ! TMSD02G (c ??”? x???3?3?3?3?3) codes,

*.You will see your password between ‘?’ character and not it and done

Unlock Samsung Karbon Iphone Ipad Xolo Phone Memory Card

Method 3

*.First you must Installmfire FExplorer

*.Now insert you sd card in your mobile without accessing.

*.Now using  FExplorer just Mobile path C:system

*.Now search mmcstore and rename it to mmcstore.txt

*.For this copy mmcstore.txt and open using not pad in PC

*.Than you will see your card password within there.

You can ask questions by comment box below

Read More »

Friday 28 October 2016

How to Confirm your Card on PayPal

Confirming yo
ur card on PayPal is same as verifying your PayPal account.

 All you need do, is to find PayPal confirmation code in your bankstatement or debit alerts and enter it on the verification page at PayPal.com.

How?

Sign in to PayPal.com

Click on "Wallet" and click on the card you want to confirm.

New page opens with screenshot of your card and it's details (billing address and expiry date)


Click "confirm credit card" link New window will open and you will see where to enter the 4 digit code for PayPal verification Enter the 4 digits code

Click Confirm .

That's all.Once you link and confirm a debit or credit card on PayPal, your account will be Verified and you'll be able to make as many payments as you like with PayPal.
Read More »

Thursday 29 September 2016

MTN 4G LTE Is Now Available For Everyone - See How To Subscribe For A Data Plan

has been on test for months now, and the uplifting news is that, MTN 4G LTE
is now open for all MTN subscribers, whether you are on MTN regular network (MTN Sim card) or VisaFone. Are you ready to rock MTN 4G LTE on your phone? If yes, i will teach you how to go about subscribing for an MTN 4G data plan and enjoy an amazing browsing and download speed.

For The Visafone SubscribersIf you were migrated from Visafone to MTN, then you are qualified to use MTN 4G without additional stress.

But note that, you won't be able to subscribe to MTN normal data plan, you will be restricted to Visafone’s data plans only. To subscribe, kindly dial *444# and follow the on-screen instructions.For The MTN SubscribersIf you are a regular / normal MTN subscriber, allyou have to do is to swap your MTN sim card for a 4G compatible Sim card.

To swap your sim card, kindly visit the nearest MTN store or partner retailer for a SIM swap.After successful Sim swap, just dial
*131#
to subscribe to any regular MTN data plan and enjoy 4G service on your phone.

REQUIREMENTS

You need a 4G LTE enabled smartphone with LTE Band 7(2600). Also a 4G compatible Visafone Sim card or MTN Sim card.

HOW TO COMFIRM YOUR SMARTPHONE
CAPABLE WITH MTN 4G LITE

MTN has made it easy for you to confirm whether both your smartphone and SIM card are compatible with their 4G service.

Just sms 4G to131and you will receive a text message inresponse telling you if either of both are compatible with the 4G LTE network.As you can see in my below screenshot, my smartphone is compatible but i need to performa Sim swap to 4G before i can be able to use the 4G network on my phone.

I received a reply that reads;

Yello! Your device is 4G ready but you need to upgrade your SIM to enjoy MTN 4G LTE. Please visit the nearest MTN store or partner retailer for a SIM swap now.For more information of MTN 4G LTE, including 4Gcoverage location; please visit www.mtnonline.com/4g or walk-in to any of our service centers nationwide.

Read More »

Wednesday 28 September 2016

How to know your computer is infected by malware

Even if you have a working and updated anti-virus program, it’s very hard to avoid a computer infection,once you are connected to the internet.

The buggers always find a way to slip in when no one is watching.For better understanding of the situation, let’s start with the differencesbetween “malware” and “virus”.

As we know, viruses are a special type of malware that is designed to replicate and spread in your PC, while malware is a general term used to describe all sorts of unwanted or malicious code.

Malware include viruses, spyware, adware, nagware, trojans, worms, and more.Here are signs to tell if your computer is infected andneeds attention.

*.Slow speed

Is your computer suddenly starts acting more like a tortoise and you’re sure it was faster when you first got it right? Try not to ignore that because malware has been known to slow down computers; taking longer to boot or programs take forever to open.

Another reason for slow system may be as a result oflow RAM memory and or low hard disk space, it’s best to check it out.

*.Pop-ups

Have you meet those annoying pop-up when trying toget work done on your system and windows start appearing randomly out of nowhere? It’s not random, it’s a virus.

A random virus maybe. These pop-ups have a tendency to carry in more viruses as they come.

*.Disabled security

When some viruses get into your PC, they cripple your defense. If your firewall is down, your anti-virus not functioning, then you have a problem.People are getting strange messages from youWell your accounts may get hacked, always make sure to always log out and set super strong passwords.
On the other hand, is a clear sign your computer may just be infected.

*.System crashes

Noticed lots of system crashes recently, are signs of bad health. Every time your PC crashes and a blue screen appears with a lot of jargon you don’t understand you better get that checked.

*.New browser homepage, new toolbars, and unwanted websites

Noticed new websites you have no recollection of opening and most times your home page gets changed. Malware does a lot without your consent.

*.Strange activity

You may also notice weird activity on your computer? Programs opening and closing on their own? Flickering and what not. Attend to any strange activity before it's too late.

Read More »

Saturday 27 August 2016

Kodi: Guide to watch your Favorite Movies Online

If you are yet to download Kodi mobile app, its either you are lost in the Kodi setting area or you don't like good things.


Today you can now watch your favorite movies online using your Kodi app, which is one of my favorite entertainment app.


Kodi also known as XBMC allows you to watch your favorite channels on your mobile devices or any other supported devices including PC users. Kodi currently trends over any other mobile TV app including TV on The Go or Mobdro.


This latest and improved version brings the Estouchy & Estuary themes on your devices.


However, Kodi version 17 beta brings a new look to the app that turns your smart phones into a media center with better music library, Live TV/DVR tweaks, clearer Settings area compared to the previous version.


How to Download Kodi Mobile TV App

*.You can download Kodi Mobile TV App from visiting kodi.tv or download from Google play store here.
Read More »

Thursday 25 August 2016

How to make money from youtube Channel Video by place Google Ads full step

Today, I want to share with you, how to get started with Adsense YouTube Monetization. Monetizing your YouTube channel with Google Adsense simply means you can start making money when anyone clicks on the google ads that display on the monetized videos on the YouTube channel. Your earnings get paid to the bank account linked to your Adsense account. Below is an how ad displaying on YouTube video. 
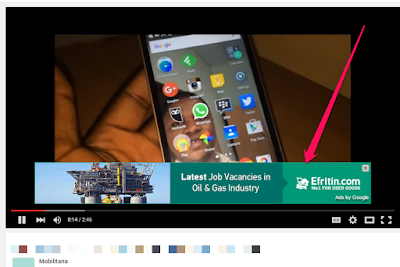
When your YouTube videos are viewed on desktop computer, the google ad can appear on the right of the feature video and above the video suggestions list. It can also appear as semi-transparent overlay ad that appears on the lower 20% portion of your video as seen above. 
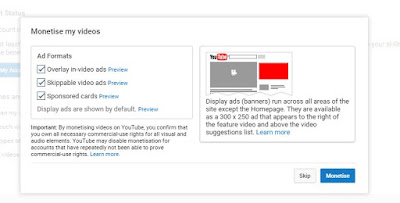
When viewed on desktop and on mobile, the ad can appear as skippable video ad which viewers can skip after 5 seconds.


It might also appear as non-skippable video ad which the viewer must watch before he or she can view your video. In addition, the ad can appear in form of sponsored card, which display content that may be relevant to your video, such as products featured in the video.


The best way to ensure you’ll be able to monetize your YouTube videos is to create all elements of the video yourself. Use your imagination to create something completely original. Examples of videos that have been successful on YouTube include daily vlogs and home videos, do-it-yourself videos and tutorials, original music videos and short films.


To get started, you must have created and uploaded unique videos to your channel and the channel must be in good standing.


To check your channel's eligibility and opt in for monetization:

==> Sign in to your YouTube channel

==> Go to the monetization tab here and click "Enable My Account". You'll only see this option if your account is in good standing and hasn't been disabled for monetization.


Alternatively, go to "My Channel" Video Manager Channel Enable 
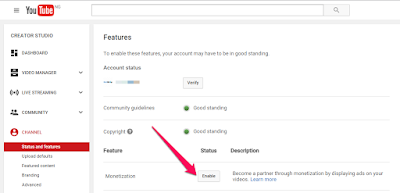
Thereafter, click "Enable My Account"


== Follow the on-screen steps to accept the YouTube monetization agreement.


From there, you’ll be given the option to select which type of ad formats will appear within your videos.


Select your desired options. Next step is to associate an approved AdSense account with your YouTube account . So, click on "link Adsense account" and follow the instruction. You can create a new AdSense account or associate an existing one. You can also link your AdSense to YouTube here. Right there, you can also change the linked AdSense account.


Last step is to enable eligible videos to earn money from relevant ads. Before monetizing your videos, ensure they abide by community guidelines.You can check list of content your can monetize here. Very Important! Ads with product placements in them aren’t allowed under the terms of service.


In other words, you can’t run YouTube videos that have ads already built into them.

Once you are sure that your videos are eligible for monetization, go to video manager, select all and select monetize. 
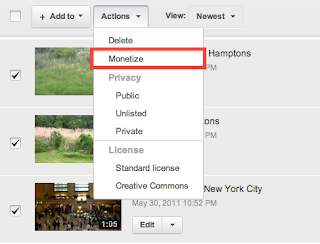
Your video will go through a standard review process before ads begin to appear. If approved, you should see a dollar ($) sign next to each video via "Video manager". You can click on the $ sign next to each video, to change the enabled ad formats. Note that if you enable monetization at the time of upload and your video is set to private or unlisted, it will remain so and without ads until you make it public.


The YouTube dashboard features an Analytics section that will summarize your earnings. You can view the estimated earnings here.Note: If you want to monetize multiple YouTube channels, you don't need to open a new AdSense account.


You can monetize more than one YouTube channel with the same AdSense account. I hope this helps.
Read More »
Designed by Jide Ogunsanya.